

Food
Keep on top with latest and exclusive updates from our blog on the Los Angeles real estate world. Cindy Bennett Real Estate posts about tips and trends for buyers, sellers, and investors every week. Whether it be about staging your property or a snapshot of the market, this is your one stop shop.

Nothing says late summer to me like watermelon, blueberries, and a cool, crisp salad, and this one is pretty perfect as a throw together last minute side at home, or a fun, fruity, colorful addition to bring to a cookout. Let me know what you think! Watermelon and Blueberry Salad with Feta INGREDIENTS 4 lbs (about 6 cups) seedless watermelon, cubed 8 oz fresh blueberries 4 oz feta cheese, crumbled 3 tbsp fresh lime juice juice (juice of about 2 limes) 2 tsp honey, or to taste 3 tbsp fresh mint leaves, julienned 1/4 cup extra virgin olive oil salt and pepper to taste INSTRUCTIONS In a large bowl combine the watermelon and blueberries. In a jar, combine lime juice, mint, olive oil, and salt and pepper, to taste. Shake thoroughly to combine. Drizzle dressing over fruit, and toss gently to coat. Top with feta. Serve immediately. Serves 6.
Read more
This is my recipe, and I'm not Greek. I have, however, been eating these from the Richmond Greek Festival for decades, and love them so much I figured out a reasonable facsimile. In fact, when my son was a toddler, he would not touch a green bean...until these. We went to the Greek Festival and he ate his, mine, and his dad's. We had to get more to take home for later. It's only a long weekend, though, so I had to figure it out, and I cooked beans this way religiously for at least 5 years! Try them, and see what you think! Greek Festival Green Beans Ingredients ⅓ cup olive oil 1 onion chopped 1 clove garlic, chopped 1 pound green beans (fresh or frozen) 15 ounces chopped tomatoes ¼ cup chopped fresh parsley (Or 1 tbs dried) 1 tablespoon chopped fresh oregano (Or 1 tsp dried) 1 teaspoon chopped fresh mint (optional) 1 teaspoon sugar (optional) ½ teaspoon salt (add more to taste if needed) fresh pepper Directions In a medium pot, heat olive oil at medium to low heat. Sauté onion until soft, then add garlic. Add beans and mix until covered with the olive oil. Add tomatoes, parsley, sugar (if using), salt and pepper. Stir together. Add hot water just enough to half cover the beans Simmer with the lid on for about 40 minutes (do not boil). The beans are ready once there is no water left and the beans are soft.
Read more
It's my birthday month, so I'm sharing one of my favorite recipes. I've loved this pasta for years, but it's also the perfect tie in for the zucchini that's coming up in my little chaotic garden. I can't wait to make this with zucchini I've grown myself! Let me know if you try it- it's super simple, with only a few ingredients, but it's absolutely delicious! Pasta with Zucchini and Prosciutto 12 oz pasta (spaghetti, linguine, tagliatelle, or fusilli) 2 medium zucchini, thinly sliced or grated 5–6 slices prosciutto, chopped or torn 1 cup finely grated Parmigiano-Reggiano 2–4 tbsp olive oil or 1–2 tbsp butter (or a mix of both) Salt & freshly ground black pepper At least 1 cup reserved pasta water Instructions: Cook pasta in a large pot of well-salted boiling water until just shy of al dente. Reserve at least 1 cup of pasta water before draining. (crucial!) While the pasta cooks, heat olive oil or butter in a large sauté pan over medium heat. Add zucchini and cook until soft and lightly golden, about 8–10 minutes. Season lightly with salt and pepper. Stir in the prosciutto and sauté just until warmed and fragrant, about 1–2 minutes. Add the drained pasta directly to the pan (or use tongs to transfer it in). Add about 1/4–1/2 cup pasta water and toss vigorously. Remove from heat, sprinkle in the Parmigiano-Reggiano, and toss well to create a silky sauce, adding more pasta water as needed to emulsify. Taste and adjust seasoning. Serve hot with extra Parmigiano and a drizzle of good olive oil.
Read more
7 large eggs 2 green onions, finely sliced 1 cup cherry tomatoes, halved 1 small red bell pepper, cored and chopped 1 cup mushrooms, if you (or the kids) like mushrooms, chopped 2 tbsp olive oil Approximately 2 cups spinach (or a few handfuls-measure with your heart) chopped Preheat the oven to 450 degrees, and place a rimmed sheet pan in to heat. In a mixing bowl, toss the tomatoes, bell peppers, green onion, and mushrooms with a good pinch of kosher salt and black pepper. Add a drizzle of extra virgin olive oil (2 to 3 tablespoons) and toss to make sure all the vegetables are well-coated. Remove pan carefully, pour and spread vegetables evenly and return to oven. Cook vegetables for 10-15 minutes or until cooked and lightly charred. Remove vegetables and turn oven heat to 400 degrees. In your mixing bowl, whisk together the eggs, baking powder, milk, feta, parsley, thyme, and a good pinch of kosher salt and black pepper. Fold in the roasted vegetables and the spinach. Coat the bottom and sides of a 10-inch cast iron or oven-safe pan and warm over medium-high heat until shimmering. Pour the egg and vegetable mixture in the pan and cook for 2 to 3 minutes to allow the bottom of the eggs to settle. Transfer the pan to the heated oven and cook for 8 to 10 minutes or until the center of the eggs are cooked through and the center of the frittata is firm and no longer runny). Serve with a garnish of fresh parsley.
Read more
Springtime is a busy one for most of us. If you've got kids, it's exams and sports and end of school, and if you don't (or if, like me, your kids are grownish) it's still pretty busy, between taxes and yard work, and just getting out and doing things that we couldn't or didn't want to do in the cold of winter. One thing is for sure, and that's if I am busy, I don't have time to cook, and pizza is often the most welcome takeout option. This particular one was sent to me from my son, currently in Japan, but on a busy day he decided pizza was the way to go, so Domino's got the call. Yes, in Japan. He said it was night and day different (in a good way) from any other chain pizza spot in the US, so maybe I'll have to try it while I'm there? Anyway, spring seems like a great time to share some of my favorites, so in no particular order and without further ado... Zorch Pizza: Just may be our new favorite for a true NY style crust. They have a spot in Carytown where you can do whole pies or by the slice in true NY fashion, and a newer pizza parlor where you can eat in and get a whole pie for the table. Really delicious in every way- crust, sauce, cheese, and toppings. They know what they're doing. (Our favorite- The Upside Down- sliced mozzarella first, parmesan, Romano, then vodka sauce, with basil on top.) They don't deliver, so get over it and get over there and pick up or eat in! It's worth it. Check them out HERE Galley Go To: An OG in our house, Galley, in Stratford Hills Shopping Center, is fantastic whether you're eating in or taking out. They have some top notch crispy chewy thin crust which is exactly what I love, and they're pizzas are a bit on the smaller size, so it's not at all unreasonable to order 2 to try something different. (Except I order the same thing every time, because these are both equally amazing. The Sweet Hot, tomato sauce, house mozzarella, fresh basil, pepperoni, parmesan, calabrian peppers, honey and the Grape and Gorgonzola, with rosemary, parmesan, roasted grapes, and honey) Check them out HERE Azzurro: Azzurro at River Road Shopping Center is a great restaurant, with fantastic salads, pastas, and mains (and their zucchini fritte is amazing), but their pizza is also a true standout, thanks to their authentic brick oven. My favorite is the Napoletana Salcice- spicy Italian sausage, marinated sundried tomatoes, artichoke hearts, and red sauce, but I've had most of them, and they're all good (of course, for the simpler, pickier, or more complicated palates, they've got a build your own option as well.) Check them out HERE 8 1/2: Really more of a true Italian feel, the carryout only (or mostly- they do have a couple of small tables) 8 1/2 has some really fabulous thin crust pizza as well. Start out with their basic red pie and add your toppings from there. Limited variety and toppings, and you won't find anything like a "meat lovers" situation here, but for that simple, real Italian feeling thin crust, this is the vibe. Check them out HERE
Read more
This is without a doubt one of the best carrot cakes I've ever had, if I do say so myself. When I had Gourmet Delights, and my food rep came in one day with a delicious, but criminally expensive, carrot cake, I had to come up with something that was close so I didn't have to sell it for $5 per slice. (Hilarious that that seemed outrageous at the time.) This is what I came up with. Servings: 12 | Prep time: 25 minutes | Total Time: 1 hour Ingredients 2 cups sugar 1 cup vegetable oil 4 large eggs 3 cups grated carrot 1 teaspoon vanilla 1 teaspoon cinnamon 1/2 teaspoon ginger 2 1/2 cups flour 1 1/2 teaspoons baking powder 1 teaspoon baking soda 1/2 teaspoon salt 1/2 cup chopped pecans 1/2 cup raisins Frosting: 8 ounces cream cheese 5 tablespoons unsalted butter, room temperature 2 teaspoons vanilla 2 cups powdered sugar Directions Heat oven to 350. Combine sugar and oil in a bowl and beat until well combined. Add eggs, carrots, cinnamon, ginger, and vanilla. Beat until well mixed. Stir together flour, baking powder, baking soda, and salt in a medium bowl. Add dry mixture to liquids gradually, beating after each addition to ensure they are well combined. Stir in nuts and raisins. Pour mixture into 2 greased and floured (preferably also lined with parchment too) 8" round cake pans. Bake until toothpick inserted in center comes out clean. 35-40 minutes. Frost with cream cheese frosting. In medium bowl, beat together cream cheese, butter, and vanilla until just blended. Add powdered sugar, a bit at a time, until well blended. Taking care not to overbeat. Frost when cake is cooled.
Read more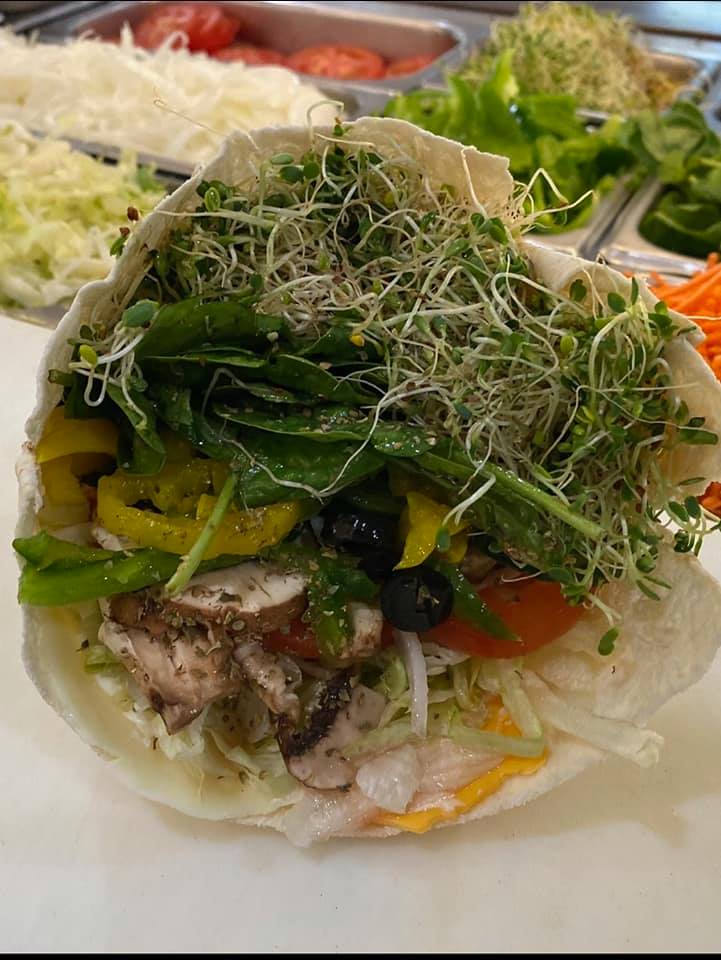
As I type this, we've got just 2 weeks until my son heads to Japan for nearly 4.5 months. He's super excited, and I'm excited for him. (Just a little bit of mom worry.) But he, like me, is quite a foodie, so it wouldn't be us if we didn't have a list to tackle in terms of spots to dine or takeout before he heads to the land of fantastic, but totally different, food. Starting out with the easy picks, because they're the "always" picks. We both love a great sandwich, so we'll definitely be dining or getting take out from... Stuffy's There's no question Stuffy's is a Richmond institution. My go to? The Great Garden on wheat pita, heated, with everything but mayo (that means it's an all veg dream, cheese, mushrooms, onions, green peppers, black olives, spinach, cucumbers, tomatoes, sprouts, oil, vinegar, s & p, and oregano. His? The Max, or Stuffy's Star (Classic Italian) Polpetti It's hard to choose the perfect one from Polpetti, because I've never had a bad sandwich there, and some days I'm feeling one or the other, but the go to is nearly always The Balboa- shaved Italian roast pork, broccoli raab, sharp provolone, with long hot peppers. Or The Caputo- roasted red peppers, arugula, fresh mozzarella, & balsamic glaze if I'm feeling like something more light. One thing's for sure, we're always going to share, and we're always getting at least one chicken cutlet sandwich- probably The OG- chicken cutlet, sharp provolone, broccoli raab, and long hot peppers. Abuelita's Funnily enough, almost every time we go here, my Mom is with us, and that is a testament to how they appeal to everyone! Their menu changes every day, but I've never had anything bad there. This is not your run of the mill Mexican. Their main option is Guisos (stews) and they always have a great variety. Served with beans, rice, and warm tortillas, they are delicious every time. They also do tamales, quesaberria tacos. (Oh, and a killer flan and tres leches as well.) The Oh So RVA picks that he always hits when he's in town... Mekong Fun fact- did you know my kid spent a focused couple of years trying everything on their menu, in order? We've been die hards since he was just starting solid foods, so this is definitely on the list. My go to? Always the Rice Noodle Salad with tofu and spring roll. It's light, but not too light, and with fresh vegetables, rice noodles, a little peanut, and delicious fish sauce, it's just the perfect bowl of the perfect bites. His go to? It depends on the day, his mood, and where his is on the menu! Thai Diner This has been an OG favorite since my kid was little bitty. He is an "American Hot" person, though he's dabbled in the world of Thai hot. Me? I'm a wimp and stick to mild or medium. Our picks here- Drunken Noodles with Chicken or Thai Fried Rice with Beef. So dang good. 8 1/2 Another lifelong favorite, we've got a "go to" order here as well. I'm always in the mood for their Eggplant Parm, with a side of spaghetti marinara, a spaghetti carbonara, or an order of penne with sausage, ricotta, and broccoletti. Never hurts to have leftovers, right? Wood and Iron Gameday You can't leave America for months without hitting a sports bar, can you? (I'm pretty sure that's a law) We'll definitely be hitting Wood and Iron one evening soon. Me for the Crispy Chicken Salad (pro tip- get a full sized, but just ask for a takeout container when you order, and you've got lunch for tomorrow), and him for the Cheese Steak Egg Rolls and an order of wings. Secret Sandwich Society Four words. Loaded Pimento Cheese Fries. Is that the only thing on the list? No. Could it be? Yes. I'm not even a "loaded" whatever sort of fan, but these are amazing. He's more a Roosevelt guy, roast beef, bacon, horseradish mayo, white cheddar, lettuce, tomato & red onions all on a toasted baguette and I love the Lafayette- fried chicken breast, ham, swiss, blue cheese spread & honey mustard on a toasted potato roll. Galley Go To One of our first picks for pizza, ever since they opened. Always on the order? Grape and Gorgonzola (Those roasted grapes with the sharp taste of the gorgonzola? Never fails.) We also always do the Sweet Hot, which features pepperoni, Calabrian peppers, and a drizzle of honey. You can't go wrong with either, but we can never choose between the two, so there you go. I'm full just thinking about all of this. (And yes, I'm cooking too!) What would be on your list??
Read more
It's March, and that means St. Patrick's Day is almost here! In my family, that doesn't mean beer as much as it always, always, always, means plentiful corned beef and cabbage. (In fact, whenever my mom finds a good deal on corned beef- usually this time of year- she'll buy 3 or 4 and freeze them for later) If you love it as much as we do (impossible!), here's a great recipe using the Instant Pot so you can set it, forget it, and don't spend all day in the kitchen. Ingredients 1 3-pound corned beef brisket, plus pickling spice packet or 1 1/2 tablespoons pickling spice 1 medium onion, sliced 3 cloves garlic, chopped 1 (14.9 oz) Guinness beer 1 cup beef broth 1 pound new potatoes 3 large carrots, cut into 3-inch pieces 1 head Savoy cabbage, cut into 2-inch wedges Kosher salt and freshly ground pepper, to taste 2 tablespoons whole grain mustard Directions Rinse brisket with cold water and thoroughly pat dry. Place onion, garlic and pickling spice into a 6 qt Instant Pot. Gently place brisket on top of the onion mixture. Top with beer and beef broth. Select manual setting; adjust pressure to high, and set time for 85 minutes. When finished cooking, quick-release pressure according to manufacturer’s directions. Remove brisket from the Instant Pot; wrap in foil and keep in a warm oven. Remove and discard onion mixture, reserving 1 1/2 cups cooking liquid in the Instant Pot. Stir in potatoes and carrots; top with cabbage. Season with salt and pepper, to taste. Select manual setting; adjust pressure to high, and set time for 4 minutes. When finished cooking, quick-release pressure according to manufacturer’s directions. Thinly slice corned beef against the grain and serve with potatoes, carrots and cabbage Serve mustard on the side, if desired. Try to save a bit for some hash or a sandwich the next day!
Read more
*Easier* Chocolate Mousse 3 1/2 ounces dark chocolate (62% cacao is ideal) 1 tablespoon unsalted butter 2 large egg yolks 1 tablespoon white sugar 1/4 cup water 1 tiny pinch salt 1/2 cup chilled heavy whipping cream Directions Break up chocolate and set aside with butter. Add egg yolks, sugar, water, and salt to a metal mixing bowl. Cook, whisking, directly over medium-low heat until the mixture is thick, foamy, and hot to the touch (145 to 150 degrees F (63 to 65 degrees C)). (Yes, you put the bowl on the heat. You can use a saucepan, but it's so much easier to whisk in a bowl!) Once the yolk mixture is thick and hot, add chocolate and butter, and whisk until all the chocolate is melted. Let rest for a few minutes on the counter, whisking occasionally to further cool the mixture to just above or at room temperature. The chocolate mixture shouldn’t go into the whipped cream while still warm, but if cooled too long, the mixture may get too firm to fold in. Whisk cold cream until medium stiff peaks form. If cream is beaten too much, it will separate and the final texture will be grainy. Transfer about 1/3 of chocolate mixture into whipped cream, and fold with a spatula until almost incorporated. Gently fold in remaining chocolate, trying to keep as much air in the mixture as possible. Transfer into 4 serving dishes, wrap, and chill before serving, at least 1 hour. Serve with more whipped cream, shaved chocolate, berries, or whatever your heart desires!
Read more
If you're anything like me, you've hit the point of the end of the holidays where your body is just saying, "no more" to cheese, chocolate, sugar, and other "celebration foods." I've wanted nothing so much as salads and vegetables for the past week, and this is a great go to. It's totally adjustable to your taste, the season, or just what you have on hand. Give it a try and let me know what you think! Seriously Good, Incredibly Flexible Vegetable Soup Ingredients 4 tablespoons extra-virgin olive oil, divided 1 medium yellow or white onion, chopped 3 carrots, peeled and chopped 2 celery stalks, chopped 2 tablespoons tomato paste 2 cups chopped seasonal vegetables, such as sweet potatoes, green beans, butternut squash, potatoes, bell pepper, zucchini or yellow squash- use your imagination (or your farm share or what you have!) 1 teaspoon kosher salt, divided 4 cloves garlic, pressed or minced 1/2 teaspoon cumin 1/2 teaspoon thyme 1/2 teaspoon oregano 1 large can small diced tomatoes (I like the Muir Glen Fire Roasted Tomatoes) 4 cups (32 ounces) vegetable broth 1 1/2 - 2 cups water (depending on how thin or thick you want it) 2 cups chopped kale, chard, collard greens, or spinach 1 cup green peas 1 cup sweet corn Red pepper flakes to taste Fresh ground black pepper to taste Directions Warm 3 tablespoons of the olive oil in a large Dutch oven or soup pot over medium heat. Once the oil is shimmering, add the chopped onion, carrot, celery, seasonal vegetables and ½ teaspoon of the salt. Cook, stirring often, until the onion has softened and is turning translucent, about 6 to 8 minutes. Add the tomato paste, garlic, cumin, thyme, and oregano. Cook until fragrant while stirring frequently, about 1 minute. Pour in the diced tomatoes with their juices and cook for a few more minutes, stirring often. Pour in the broth and water. Add ½ teaspoon more salt and red pepper flakes (if using). Season generously with freshly ground black pepper. Raise the heat and bring the mixture to a boil, then partially cover the pot and reduce heat to maintain a gentle simmer. Cook for 25 minutes, then remove the lid and add the chopped greens (this is also where I add the peas, corn, or other vegetables that don't take as long to cook). Continue simmering for 5 minutes or more, until the vegetables have softened to your liking. Remove the pot from heat. Stir in the remaining 1 tablespoon of olive oil. Taste and season with more salt, pepper and/or red pepper flakes. (You might need up to one more teaspoon of salt, depending on your broth and your personal tastes.) Divide into bowls and enjoy! Keeps well in the refrigerator for 5-6 days, and freezes well for later as well.
Read more